|
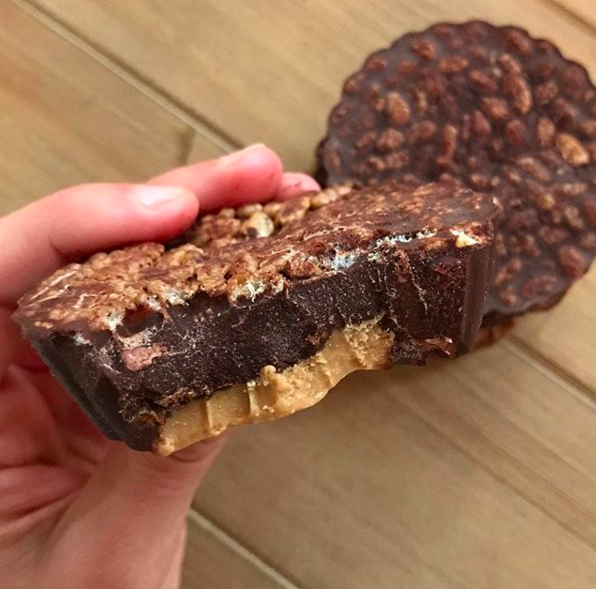
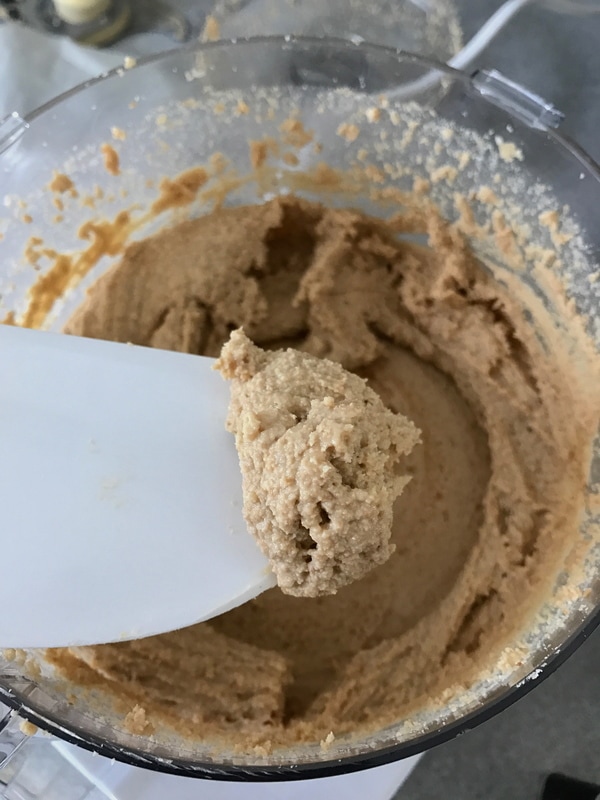
Chaga, who!? Chaga, what!? Adaptogens are popping up everywhere these days, in drinks, in coffee, in powders. But what the heck do they do? Well adaptogens do pretty much what they say, they help your body "adapt" to stressors. Chaga is an adaptogenic mushroom that Birch Boys forages from the Adirondack Mountains. It's mainly known for it's ability to give you long lasting, sustainable energy but has SO many other health benefits! It's an anti-inflammatory, nutrient powerhouse, stress reliever, and immune booster. Chaga is something that can adapt to anyones lifestyle (see what I did there ;)) and being a fitness instructor, it's important to include something in my life that's going to keep my energy levels high, help my muscles recover, and overall keep my body (and immune system) functioning. Birch Boys chaga coffee is my favorite product and gives me the energy boost of coffee, without the 3pm crash. I also love their maple chaga tea for an afternoon sip. It's a little earthy, little sweet, and lotta delicious. :D I wanted to find a way to reuse my coffee grinds since I was brewing it everyday, so I came up with these Chaga-late Coffee Energy Balls! They are also made with cacao powder, flax meal, Further Food collagen, dates, and nuts, which all have their own extra health benefits. Check out this video to find out why Iove Chaga so much and how to make these all day energy fudge-like balls! **Always consult your doctor before consuming new supplements.** 25% off your first Birch Boys order w/ code BASOUSA25 10% off Further Food Collagen Peptides w/ code BASOUSA10 Chaga-late Coffee Energy Balls1/2 cup of cashews 1 cup of pecans 1/3 cup of flax meal 2 scoops of Further Food collagen peptides 1 heaping Tbsp of cacao powder 1 tsp of cinnamon scant 1/2 tsp of salt 5 pitted dates 1 Tbsp of Birch Boys (brewed) coffee grinds 1 tsp of pure vanilla extract 1-2 Tbsp of water Place the nuts, flax meal, collagen, cacao powder, cinnamon, chaga coffee, & salt in food processor & pulse until combined (it will be a coarse flour like texture).
Add dates, vanilla, & 1 Tbsp of milk then pulse again until a sticky dough forms. If dry, add another Tbsp of water. Roll into balls & sprinkle w/ more salt & spice. Store in fridge or freezer.
3 Comments
A collection of all things pumpkin! If you have some cans of pumpkin the need to be used up, here are some ideas.
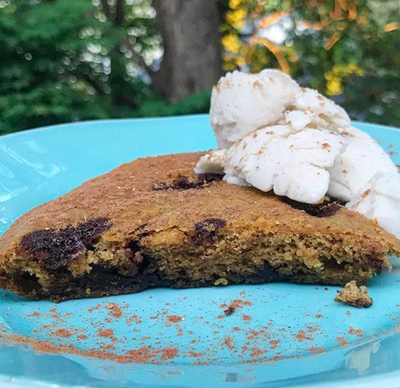
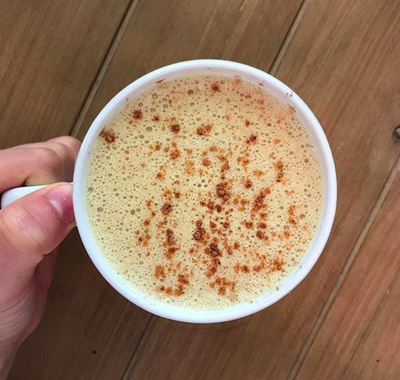
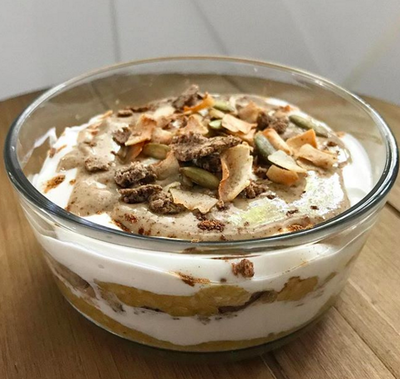
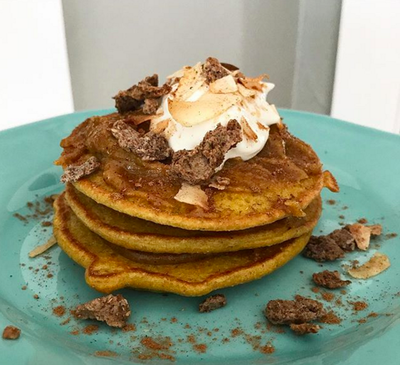
From top left to bottom right: (click on photo for recipe) Chocolate Chunk Pumpkin Skillet Cake Pumpkin Caramel & Peanut Butter Crunch Cups Pumpkin Hummus Pumpkin Spice Bulletproof Latte Pumpkin Oatmeal & Yogurt Parfait Pumpkin Blender Pancakes In the post below, you'll also find my pumpkin muffins which can be turned into waffles! This cookie skillet is SO easy and SO freaking good, it's always a party or household favorite. No lie, I probably make it 2-3x per month. It always comes out with a crispy crust and slightly soft inside, exacttttllyyy the way a cookie should be! 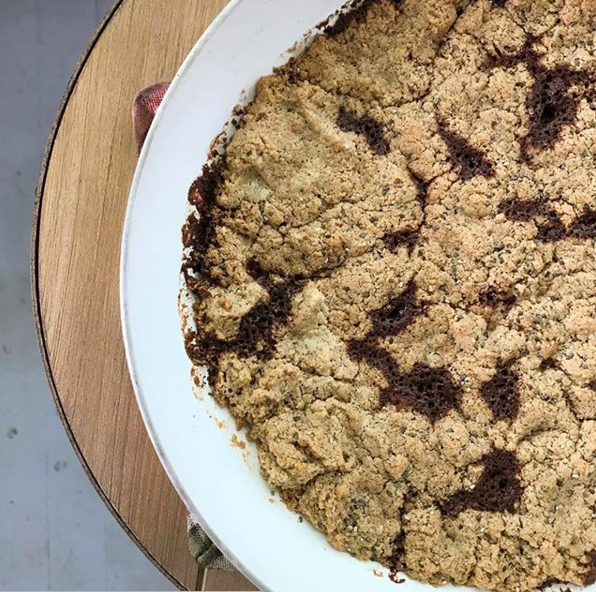 Chocolate Chunk Cookie Skillet1/2 cup of tahini 1/2 cup of nut (or seed) butter (any will work - cashew, almond, mixed, sunflower) 1 large egg 3 Tbsp of maple syrup 1/2 tsp of vanilla 1/2 tsp of cinnamon 1/2 tsp of baking soda 1/2 tsp of salt 1/4 cup of chocolate chunks 1 Tbsp of chia seeds (optional) Preheat oven to 350. Grease 10in. skillet with coconut oil. Mix all ingredients (minus chocolate chunks) together in a large bowl until well combined and dough forms. Fold in chocolate chunks. Transfer cookie batter into skillet and spread evenly. Top with a few more chocolate chunks & sprinkle with salt (optional). Bake for 16-18 minutes until golden brown. Let cool for 5-10 minutes before serving.
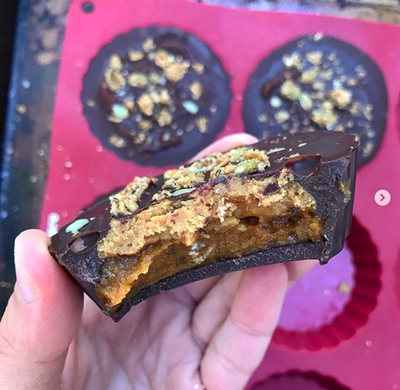
Yes, it's true - the BEST muffins in the world have just been born!! These came out perfectly crispy on the tops and with cloud like fluff on the inside. I mean, what else could you ask for in a muffin? I've made a Golden Oat Banana Bread before and the spices made it insanely flavorful so I knew these would be the same but they STILL blew my mind! I used a recipe from one of my favorite cookbooks Against All Grain, Meals Made Simple by Danielle Walker for inspiration to make these grain free/gluten free. There's no added sugar in these muffins so they have the perfect amount of sweetness from the banana. With added protein from the Further Food Collagen Peptides, these make the perfect grab and go breakfast or pre/post workout snack. These muffins are definitely going to be on my weekly rotation! 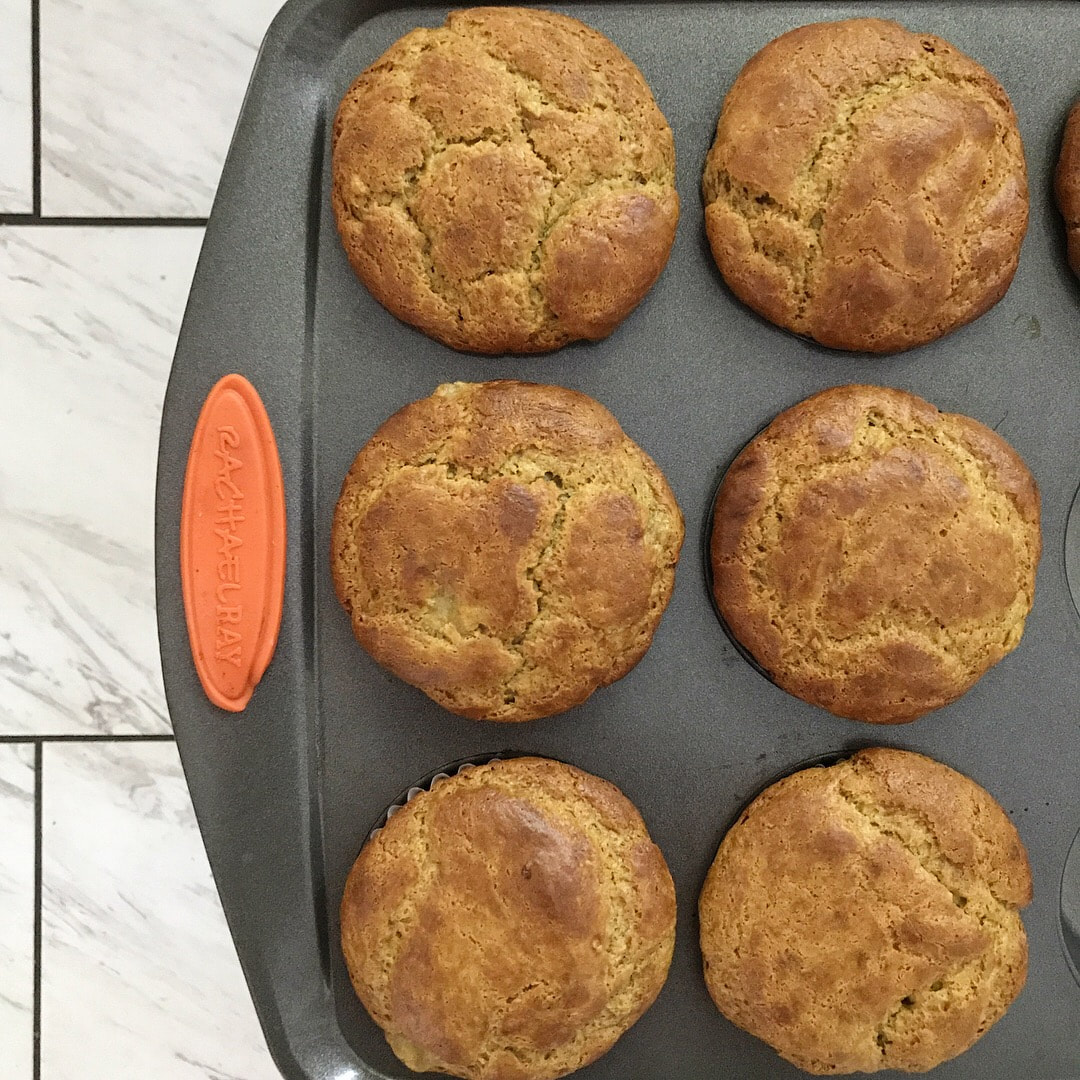  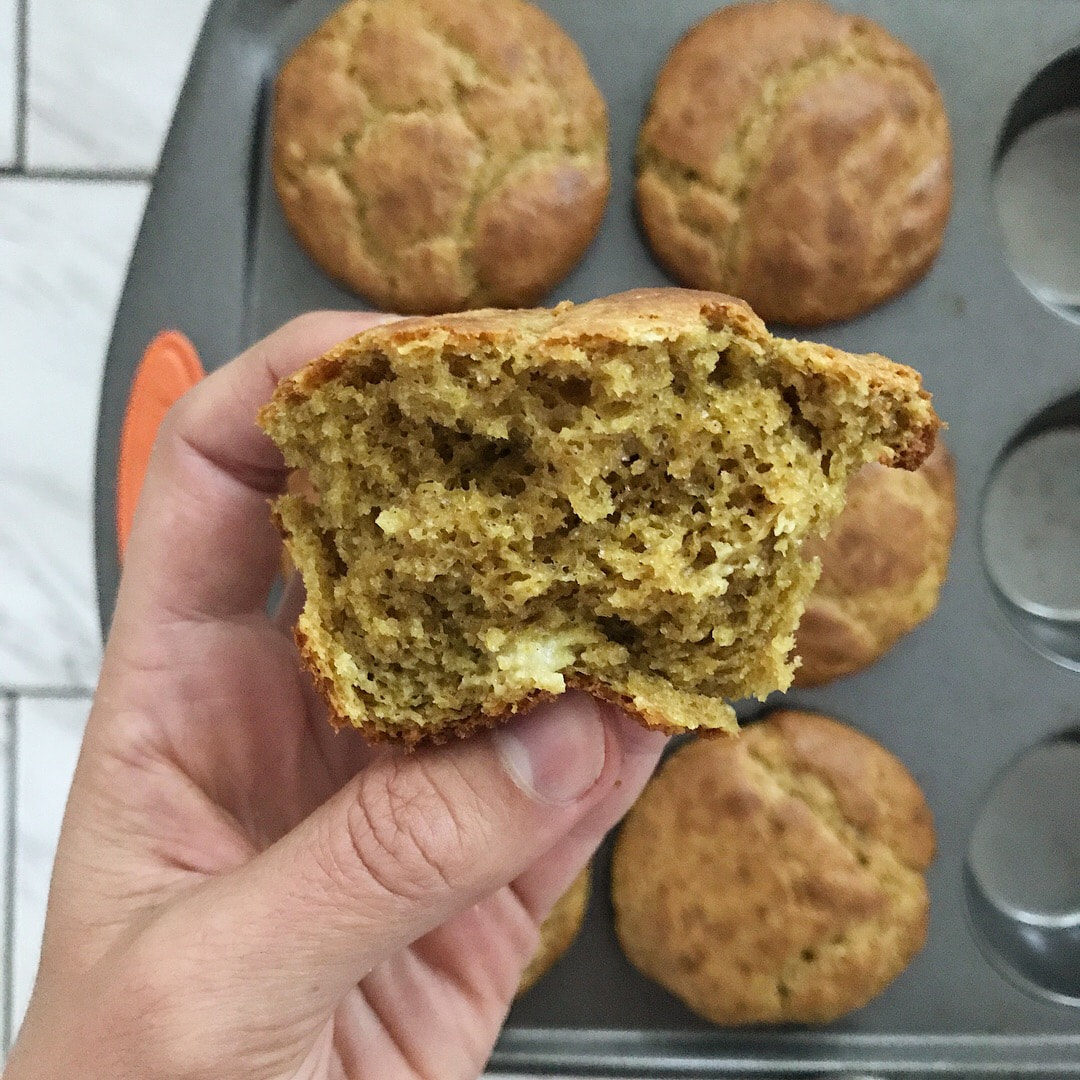 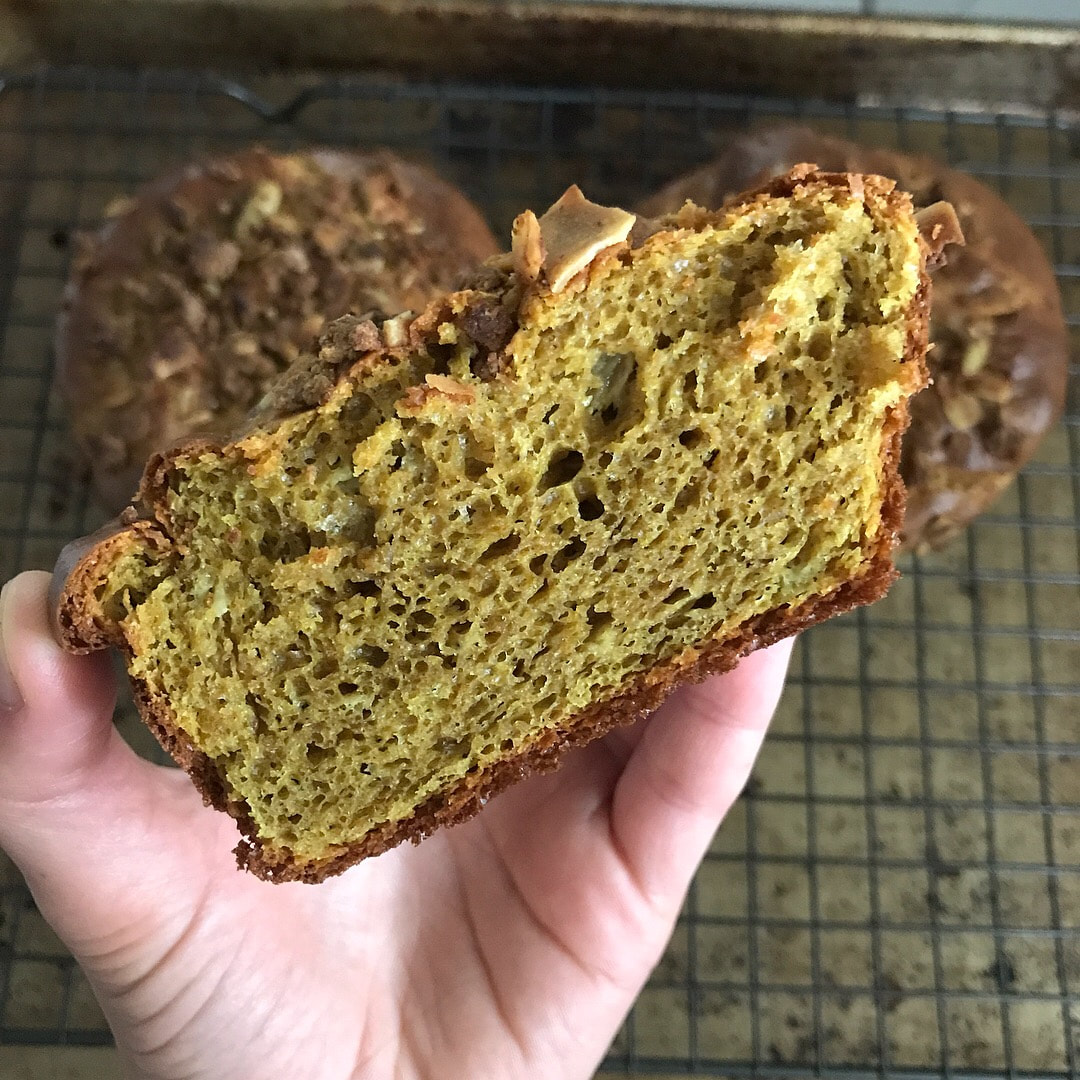 Golden Milk Banana MuffinsServings: 10 muffins 2 eggs 3/4 cup of unsweetened sunflower seed butter 1/2 cup of mashed banana 3 TBSP of softened coconut oil 1 tsp of vanilla extract 1/2 tsp of warming spice (or pumpkin pie spice) 1/2 tsp of turmeric 1/2 tsp of cinnamon 1/4 tsp of coriander 1/4 tsp of sea salt 2 tsp of baking powder 1/2 cup of arrowroot powder 2 scoops of Further Food Collagen Peptides* *Use code BASOUSA10 for 10% off! Preheat oven to 350 & place liners in (or grease) muffin tin. In a large bowl combine all ingredients up to baking powder & mix well. Fold in arrowroot powder & collagen peptides until batter forms. Scoop 3 TBSP of batter into each tin (you should get 10 muffins). Optional to add a sprinkle of granola or nuts on top for some crunch. Bake for 16-18 minutes until golden brown & knife comes out clean. The knife may come out with some banana on it but as long as no batter comes out, they're done. Let cool in pan for 10 minutes then transfer to cooling rack to finish. Once completely cool, store in airtight container in the fridge & reheat/toast to eat. OK - WHY have I not been making chocolate filled cups at home until now!? It's insane how easy and simple this process was AND how amazing these taste. After seeing these healthy versions of chocolate filled cups popping up all over Instagram (like Eating Evolved), I finally decided to buy my own mold and make some at home. I wanted these to be a late afternoon snack that I could grab before teaching that was filled with protein, healthy fats, and antioxidants to give me an energy boost before teaching at night. SO, I used raw cacao powder, coconut cashew butter and Further Food collagen peptides. I KNOW, these are like magic in a cup!! They are the perfect pick-me-up treat for a boost of energy or to satisfy a sweet tooth. If you have social media, you've probably seen collagen peptides popping up everywhere. Well, that's because collagen has so many amazing health benefits for your digestive system, skin/hair/nails, and bones/muscle recovery. I add it to my morning matcha or latte everyday and the best part is, it makes it SO frothy!! From taking collagen peptides daily, I've definitely seen my nails get thicker/stronger and from someone who has had wavy/frizzy hair her whole life, collagen has helped smooth it out and add shine. I do take a few supplements for my digestion but I would like to believe that collagen has taken part in helping strengthen the walls of my digestive system as well. You can visit furtherfood.com to learn more about the health benefits of collagen and if you want to try it, use discount code BASOUSA10 to get 10% off! 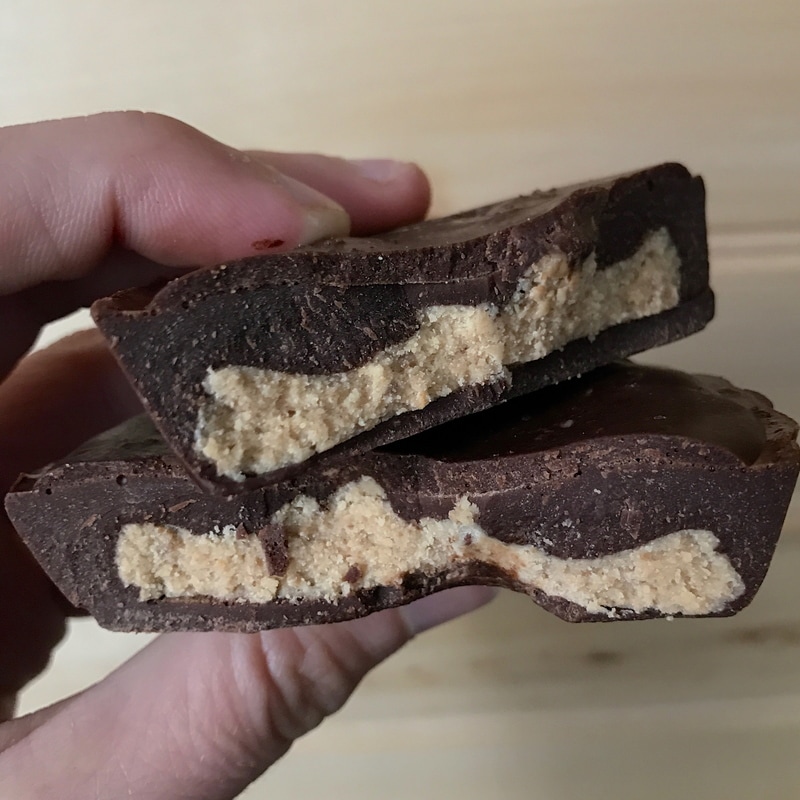 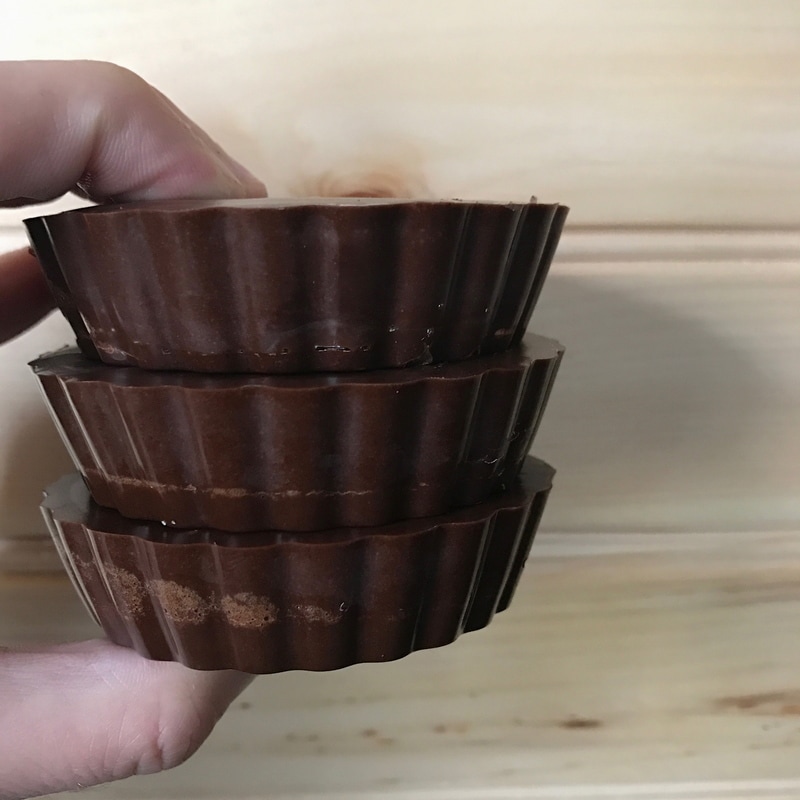 Chocolate Collagen Cups with Coconut Cashew ButterServings: 6 LARGE cups 1 cup of melted coconut oil 1 cup of raw cacao powder 2 tsp of pure vanilla extract 1/4 cup of Further Food collagen peptides* big pinch of salt 6 Tbsp of vanilla roasted coconut cashew butter (or nut butter of choice) You'll also need: silicon tartlet mold (mine is from Amazon)** Notes: *Use discount code BASOUSA10 for 10% off! **If you have a cupcake/muffin tin, you can fill it with liners and use that. You may just need to adjust the amount of nut butter per cup. Make your chocolate: To a liquid measuring cup, add coconut oil, cacao, vanilla, collagen, and salt, then whisk until well combined. Place silicon mold on top of a cookie sheet, TRUST ME, this will make it easier to transfer without spillage. Add 2 tsp of chocolate to the bottom of each mold cup and swirl around until bottom is coated. Place in the freezer for 5-10 minutes until hardened. Once chocolate bottoms are hardened, add 1 Tbsp of cashew coconut butter to each mold cup on top of the chocolate. Press down with fingers to flatten and spread out. Pour remaining chocolate on top of nut butter to fill each mold cup. Place in the fridge overnight (or freezer to harden quicker). Once cups are solid, remove from the mold & EAT THEM! Store extras in the fridge or freezer.
Can a girl ever have enough nut butter? NEVER. Luckily, there's TONS of varieties of nut butters on the market today. So, I decided, why not try my own? The plus of making your own nut butter at home is you can make it any way you want and experiment with combining different nuts (and coconut). This will not be the last nut butter I make at home, stay tuned! 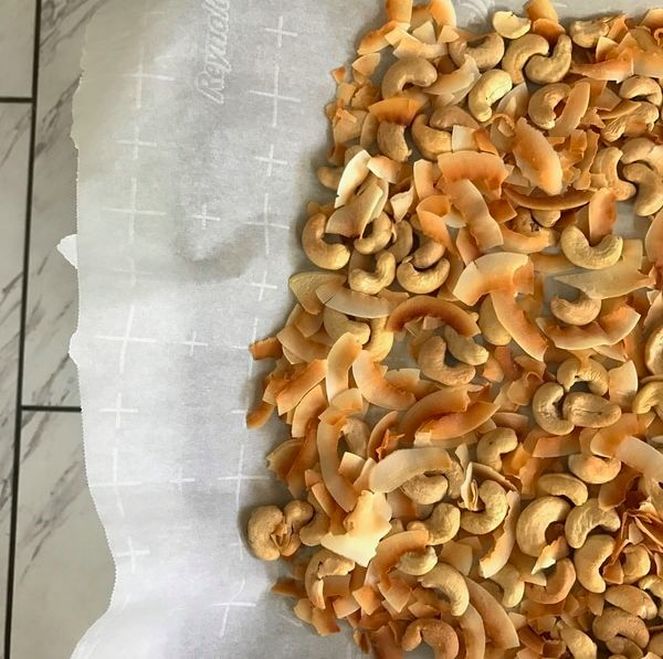 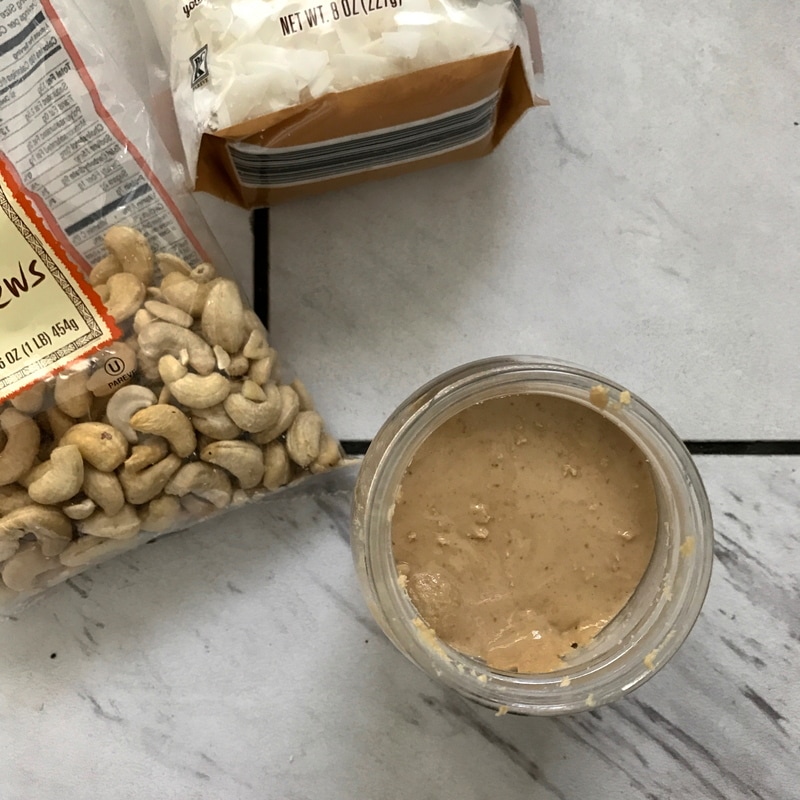
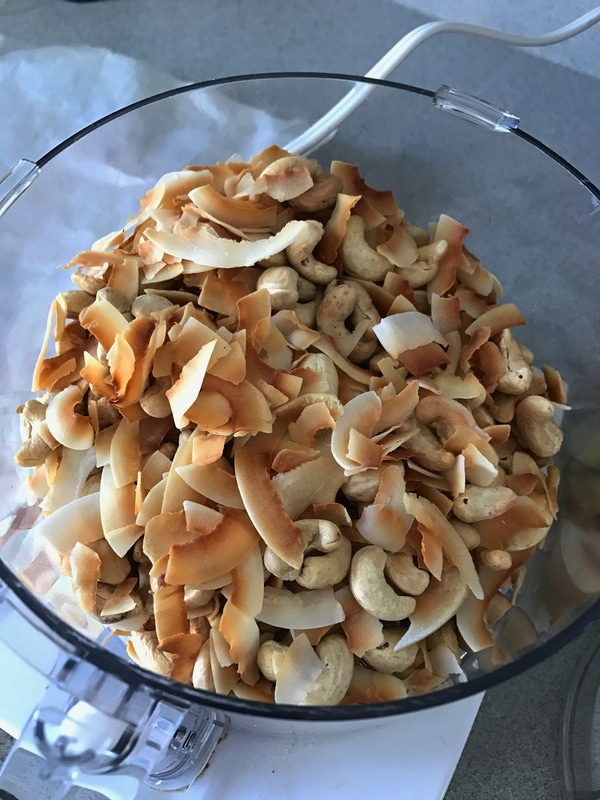
Vanilla Roasted Coconut Cashew Butter2 cups of raw cashews 2 cups of unsweetened coconut flakes 1 tsp of pure vanilla extract big pinch of sea salt Preheat oven to 300 degrees. Parchment a large cookie sheet.
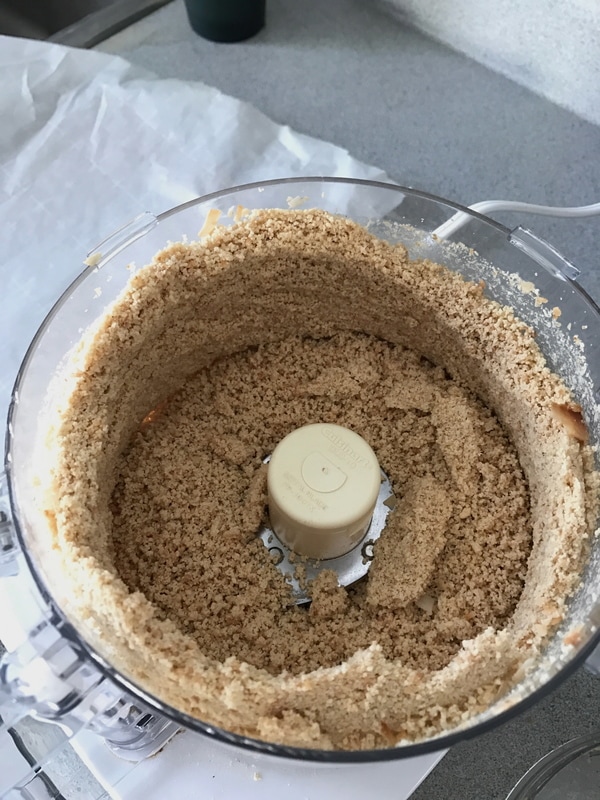
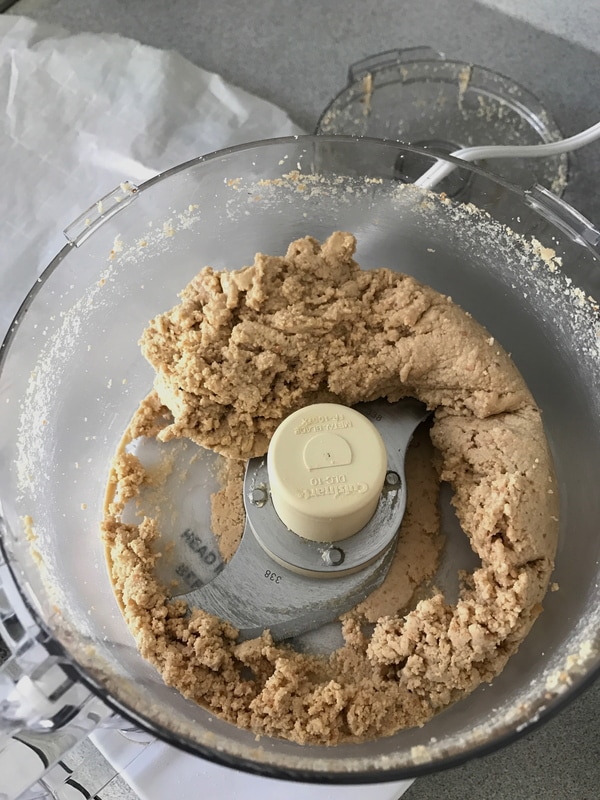
Spread cashews and coconut flakes out on the cookie sheet, bake for 12-15 min. until golden brown. Right out of the oven, transfer toasted cashews and coconut to the food processor. This is important, it will blend and smooth out easier when it's hot! Add vanilla and salt. Turn on the processor and begin blending until it becomes a coarse meal. Scrape down the sides and keep blending. A sticky ball of paste will start to form, ALMOST THERE, keep going!! Eventually, the mixture will start to smooth and the "butter" will form. See photos above. Once the butter is to the consistency you prefer, transfer to an airtight jar and store in the fridge. Then, put that *ish* on EVERYTHING! This cake is like a cinnamon bun, pumpkin pie, and pecan pie all tied into one. Make it for the sole fact that your entire house will smell like freshly baked cinnamon rolls and toasted pecans. It's mouth watering, for real.  Then, you pour the maple glaze over the top and you're speechless. Try not to devour it right at that moment, I dare you.  The best part about this cake? You can call it a guilty pleasure for how amazing it is BUT you don't have to feel guilty at all. Life's too short not to enjoy a sweet treat.
Pumpkin & Pecan Crumble Oatmeal Cake Cake Batter 3/4 cup of boiling water 1/2 cup of quick oats 1/4 cup of maple syrup 1/2 cup of light brown sugar 2 (heaping) Tbsp of pumpkin puree 1 egg - room temperature 3/4 cup + 2 Tbsp of all purpose flour 1/2 tsp of baking soda 1/2 tsp of cinnamon 1/4 tsp of salt Pecan Crumble 1/2 cup of chopped pecans 1/4 cup of light brown sugar 1/2 tsp of cinnamon 1/8 tsp of salt 2 Tbsp of coconut oil - melted Maple Glaze 1/2 cup of confectioners (powdered) sugar 1 Tbsp of vanilla almond milk (or milk of choice & add 1/4 tsp of vanilla extract) 1 Tbsp of maple syrup Cake Batter
Preheat the oven to 350 degrees. Parchment or grease an 8 inch square baking pan. Start by making your oatmeal base, combine the boiling water & quick oats then set aside. In a separate large bowl, whisk together the flour, baking soda, cinnamon, and salt. To your oatmeal base, add the maple syrup, brown sugar, pumpkin, and egg. Mix together until well combined. Add this wet mixture into your flour mixture and whisk together until just combined. If your batter seems dry, you can add more water little by little until it's smooth. Don't over mix! Pour cake batter into pan and spread out evenly. Set aside and make your pecan crumble topping. Pecan Crumble Combine all ingredients in a small bowl and toss together until the pecans are all coated. Sprinkle the crumble over the top of the cake batter. Place the cake in the oven (on the middle rack) for 25-30 minutes until fully cooked through and a toothpick (or knife) comes out clean. Let the cake cool in the pan for 10-15 minutes then transfer to a cooling rack. Once it's cool, you can make your glaze. Maple Glaze Whisk together all ingredients in a small bowl until smooth. Use the whisk to glaze your cake using a zig zag pattern or if you prefer dumping it on top, that works too! :P Cashew cream is AMAZING. The uses and variations are endless. It's SO easy to make and a useful nutritional replacement to have on hand. The slightly sweet and buttery cashew nut is packed with energy, antioxidants, minerals and vitamins that are essential for long-lasting health. I recently used it as a replacement for heavy cream in my lightened up chicken pot pies. It gave them the same creamy, rich taste and texture that cream does PLUS healthy brain boosting fats. I've also used it as a frosting for chocolate cupcakes. The recipe below is a base and from there you can take it SO many places! Try it sweet, savory, or spicy.   Cashew Cream1 cup of raw organic cashews filtered water Place cashews in a bowl and pour in enough filtered water to cover them completely. Let soak for 2-3 hours minimum (out on the counter is fine) or up to overnight (in the fridge).
After soaking, drain water from cashews. Place cashews in a high-speed blender with (new & clean) filtered water. The amount of water will depend on the thickness you want the cream. If you're making something like a frosting start with a few tablespoons of water. If you're making a liquid cream for soup, pasta, etc. then start with 1 cup and add 1-2 tablespoons at a time until desired consistency is reached. Once the cream is smooth, pour into an airtight container and store in the fridge until ready to use. This cream will keep around 2 weeks.  Banana Blueberry MuffinsServings: 12 muffins 2 cups of spelt flour (or whole wheat) 3 tsp of baking powder 1/2 tsp of salt 1 tsp of cinnamon 1/4 cup of light brown sugar 1/4 cup of cane sugar 1/4 cup of coconut oil - melted 1.5 large bananas - mashed (about 3/4 cup) 2 Tbsp of maple syrup 2 tsp of pure vanilla extract 3/4 cup of almond milk (or milk of choice) 1/2 cup of plain greek yogurt 1 cup of blueberries 1/2 cup of chopped pecans *Recipe can be vegan if you use a dairy free yogurt instead of greek. Preheat oven to 350 degrees and line muffin tin with baking cups.
Whisk together the flour, baking powder, salt, and cinnamon. In a separate bowl, beat together the coconut oil with the brown and cane sugar until smooth. Add the banana and whisk together. Mix in the maple syrup, vanilla, yogurt, and milk until well combined. Fold the wet ingredients into the dry until just combined, being careful to not over-mix. Lastly, fold in the blueberries and pecans. Scoop the batter into the muffin tin then place in the oven to bake for 20-25 minutes until the knife comes out clean. One year for Halloween I dressed as the cookie monster and I swear it was the most fitting costume ever. I have such a sweet tooth and I could eat cookies every day for every meal if you let me. Lately, I've been picking up almond fig biscotti from my favorite local coffee shop Thinking Cup. There's something about dipping biscotti in coffee that makes me feel like I slightly fit in with the neighborhood Italian culture. To me, it's more of identifying with the ritual of taking a mid-day break to let the world stop, if even for a moment, to sip and savor the coffee while occasionally dipping the biscotti in to enhance it's nutty, roasted flavor.  Because biscotti are twice baked, they develop a crunch factor that is addicting. These biscotti are egg and butter free so snack freely my friends. Spelt flour's mildly sweet and nutty profile adds a whole 'nother level of flavor to these cookies while contributing fiber and a long list of vitamins/minerals. Add in some cinnamon, honey, and almonds then we're talking mellow, sweet, gimme more biscotti.  Honey Cinnamon BiscottiServings: ~ 16 biscotti 2 cups of spelt flour 3/4 cup of almond flour 1/2 cup of sugar 1 cup of almonds 1/2 tsp of baking soda 1/2 tsp of baking powder 1/2 tsp of salt 1-1.5 tsp of cinnamon 1/2 cup of water 1/2 cup of honey 1/4 tsp of pure vanilla (or almond) extract Preheat oven to 350 degrees. Grease or parchment a cookie sheet. Combine dry ingredients in a large bowl and mix well. Combine wet ingredients in a separate small bowl and mix well. Pour wet ingredients into dry ingredients and fold together until dough forms (I find using your hands is the best way!) Divide the dough in half. Form each half into a small loaf shape and place onto cookie sheet, making sure to leave enough space in between them. Place in the oven for 30 minutes; remove from oven and let cool for 10 minutes. Turn down the oven to 325 degrees. Once cool, slice horizontally into about 1/2 inch slices. Put the slices cut side up back onto the cookie sheet and place in the oven for another 20-25 minutes until the biscotti is golden brown.  |


Proudly powered by Weebly